Sorry Giovanni, didn't mean to scare you but it can be a problem area as Groily says! I'm just behind you with the magneto. I've just rebuilt it. That points adjuster locknut is really hard to tighten. What's the secret groily?
Dave
Model 30, '56 - engine studs
-
dave16mct

- Member
- Posts: 3246
- Joined: Mon Jan 01, 1990 12:00 am
- Location: LANCASHIRE UK
-
Groily
- Member
- Posts: 2159
- Joined: Thu Jul 04, 2002 1:00 am
- Location: NORMANDIE FRANCE
Re: Model 30, '56 - engine studs
Ha! You're the 2nd person who's asked me that question this week Dave.
Two things: first, is the lock nut on the new point a true 4BA? - some supplied with replica sets are larger across the flats and make it v hard with an open-ender.
If it's a true 4BA but still a swine because the last tweak needed is just where the spanner slips off / the jaw can't go any further - been there a few times myself - what I always do is I set the gap as per usual, then take the cb off, undo the central brass block - one screw - and then use a 4BA socket or ring on the lock nut while holding the hex on the head of the point still. Refit, job done. Takes about 5 minutes usually . . . Slightly boring, but better than damaging anything!
-
dave16mct
- Member
- Posts: 3246
- Joined: Mon Jan 01, 1990 12:00 am
- Location: LANCASHIRE UK
Re: Model 30, '56 - engine studs
Thanks for that. The points are ancient and I will look for a new set but I've stoned them clean as best I can but just couldn't tighten the locknut enough. I'm going to look for or make a better 4BA nut. By the way I did the condensectomy and fitted the Easycap condensor which is a great idea. I found it quite easy to do.
Dave
Dave
-
GBM
- Member
- Posts: 29
- Joined: Mon Sep 04, 2023 3:12 pm
- Location: - ITALY
Re: Model 30, '56 - engine studs
Dave,
understood the problem and I need to find a good way to seal the dynamo.
>or or make a better 4BA nut.
I miss the point on this, may I ask to clarify to a newbie like me?
/Giovanni
understood the problem and I need to find a good way to seal the dynamo.
>or or make a better 4BA nut.
I miss the point on this, may I ask to clarify to a newbie like me?
/Giovanni
-
dave16mct
- Member
- Posts: 3246
- Joined: Mon Jan 01, 1990 12:00 am
- Location: LANCASHIRE UK
Re: Model 30, '56 - engine studs
The K2F magneto contact points are adjusted by loosening the locknut, then adjusting the points. Then tightening the locknut. But the nut is almost impossible to turn with a spanner. I'm going to try Groily's method today. I'll report back. It's strange that I've never had any trouble with it before. Like a lot of jobs in the workshop, the 5 minute jobs now take all afternoon!
Dave
Dave
-
clive

- Member
- Posts: 5671
- Joined: Mon Jan 01, 1990 12:00 am
- Location: LONDON UK
Re: Model 30, '56 - engine studs
Dave be careful stoning back the points. The harden area (i think tungsten) is quite thin. If you have gonevthrough it the sparking will erode thr points. Groily will correct me if this no longer holds true.
clive
if it ain't broke don't fix
if it ain't broke don't fix
-
Groily
- Member
- Posts: 2159
- Joined: Thu Jul 04, 2002 1:00 am
- Location: NORMANDIE FRANCE
Re: Model 30, '56 - engine studs
Not sure how thick the pad is on top of the fixed point stud to be honest, and think it probably varies a bit between old Lucas bits and the various replicas. But, unless there are deep craters (which can very seldom be got back to flat and shiny), fine emery is usually OK and won't remove too much. I tend to stick a sheet of 600 grade or similar on a bit of flat glass, and then give the tip a good few figure-of-eight turns with light pressure.
The opening point I usually clean using the same approach except you can't do figures of eight, has to be left-and-right rubadub holding things flat as you can over a ledge.
The hassle these days is that new points sets for the brass contact breakers are getting hard to find.
Priory Magnetos list them, though, at £22.50, which is money very well-spent if you need them and if they're in stock.
It's easy to find the points for magdynamos and N1s with face cam set-ups (various suppliers, all over e-bay), and also for the later steel backplate contact breakers for K2Fs etc (from eg Grove Classics the Velo folk). Complete new steel-type cb assemblies are available from them and maybe others and are unquestionably the affordable and simple way out of trouble with a worn brass assembly. They also have the advantage that they can operate clockwise and anti-clockwise as long as the 2nd point is present on the middle bit. (Some just have a rivet where Lucas had a 2nd tip, which limits them to anti-clockwise drive magnetos like ours, or requires modifications.)
The two drawbacks to the later assembly are that i) the LIVE point is the opening one as opposed to the fixed one on brass units, so if the blade spring kisses the camring as it goes round - bye bye spark; and ii) for those who have magnetos (not K2Fs luckily) without a main earth brush, there is no facility on the steel unit for an earth brush on the rear face. Where brass assemblies on K2Fs have an earth brush on the back, it's an add-on auxiliary and not essential - but it is needed on some older magnetos.
It is also possible to silver solder new tungsten tips from other cb sets onto worn parts, but it's a bit of a faff. As it is possible to turn down and rethread larger diameter parts to suit - if anyone's parts bin should contain anything suitable with a nice tip on the end.
------------------------------
An additional concern, while we're here and before anyone asks, is wobble on the opening point caused by the hole in the fibre heel going oval and by serious wear on the pivot post. You do not want much wobble, as it can cause unevenness in the firing interval, sometimes increases the risk of arcing as the points don't open cleanly, and it degrades spark quality.
Kits were sold, I think by Tony Cooper and/or Sean Hawker or maybe others, for replacing the pivot post, but not sure if they are still available - and in any event it's another fiddly job as they're riveted / peened and the post is multi-diameter along its length.
If there is serious wear on heel and pivot, there are ways round. Holes can be taken out to round (within reason) and oversize pivot posts made and fitted, but it needs patience and a certain mindset!
It is also possible to fit a cb assembly from a BTH or other magneto of the same rotation. It might mean suppressing and recreating the keyway that registers the unit on the armature (but not always with BTH, depends on the bits) but you get a better designed and longer-lasting result as the BTH (and Bosch) designs were better. I've run one Lucas mag with a BTH points set for a while - and it's been fine. Basic dimensions, taper angles and so on were standardised about 100 years ago, so it's maybe useful to know that parts can be interchanged with only modest hassle.
Just me, but I'd say nowadays 'never thrown away ANY contact breaker parts, however worn'. They may have to be refurbed down the line. There are those who have gone to the trouble of making complete brass-type backplates from scratch, but that, again, is a tricky number as the dimensions are critical to within a few thou. A person with CAD skills a CNC machine and a suitable lump of material could probably knock them out from bar stock quite easily after getting the design right, but no-one has so far seen fit to. I wish someone would because they would sell well I think.
-
dave16mct
- Member
- Posts: 3246
- Joined: Mon Jan 01, 1990 12:00 am
- Location: LANCASHIRE UK
Re: Model 30, '56 - engine studs
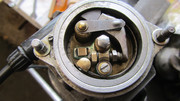
This is the locknut I couldn't tighten. It's worn and very thin.
This is the new locknut and I found some very good points to use.
I had to make a new 'pimple' in grey PVC as it was missing.
Back in the mag, I can adjust it in place now.
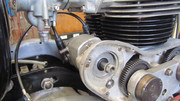
Mag installed on the bike. Just need to get the nut on the back of the bottom bolt now. Should only take me all afternoon!
Dave.
This is the new locknut and I found some very good points to use.
I had to make a new 'pimple' in grey PVC as it was missing.
Back in the mag, I can adjust it in place now.
Mag installed on the bike. Just need to get the nut on the back of the bottom bolt now. Should only take me all afternoon!
Dave.
-
Groily
- Member
- Posts: 2159
- Joined: Thu Jul 04, 2002 1:00 am
- Location: NORMANDIE FRANCE
Re: Model 30, '56 - engine studs
Nice one Dave. Plenty of life in all those bits by the looks of. Job done!
-
dave16mct
- Member
- Posts: 3246
- Joined: Mon Jan 01, 1990 12:00 am
- Location: LANCASHIRE UK
Re: Model 30, '56 - engine studs
Thanks Bill. I just finished putting the magneto on.The nut on the bottom bolt was as tricky as I remembered. I fiddled about with all sorts of dodges that didn't work, like taping the nut to various spanners but eventually I remembered my telescopic magnet on a stick which worked first go! 
Dave
Dave